Use Document Explorer Right-Click Context Menu
There are several ways you can use the Documents Explorer to manage the documents in your case. The right-click context menu in the explorer provides several additional options to make your workflow quicker and more efficient.
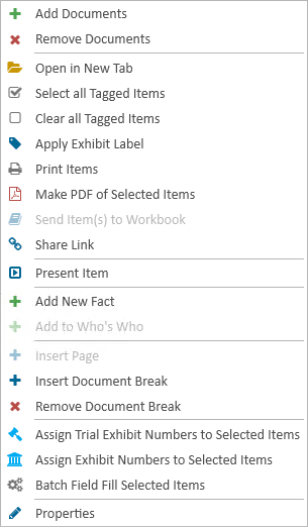
Below are explanations of the options in the right-click context menu:
|
Option |
Definition |
|
Add Documents |
Opens the Add Documents dialog. |
|
Remove Documents |
Removes the selected documents. |
|
Open in New Tab |
Opens the selected document in a new work area tab. |
|
Select All Tagged Items |
Selects all the documents with the check box next to each document name checked or "tagged". When documents are selected, more options for applying changes become available. Tagging items makes applying changes to several different documents scattered throughout the Documents Explorer much easier. To tag an item, you can click the check box to the left of each document name in the Documents Explorer. When a document is tagged, it remains tagged until you uncheck the box. |
|
Clear All Tagged Items |
Unchecks all the documents with the check box or "tag" to the left of the document name checked. |
|
Apply Exhibit Label |
Allows you to quickly apply an exhibit label to the selected document(s). |
|
Print Items |
Initiates the printing process for any documents selected in the Documents Explorer. |
|
Make PDF of Selected Items |
Initiates the PDF creation process for any documents selected in the Documents Explorer. |
|
Send Item(s) to Workbook |
Initiates the process to move any documents selected in the Documents Explorer to a selected workbook. |
|
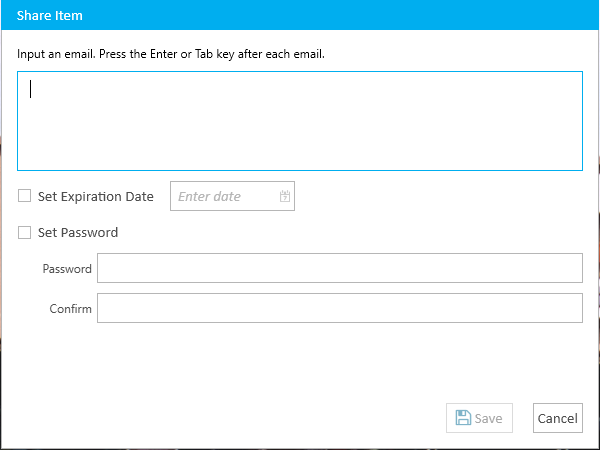
Share Link |
Opens the Share Item dialog where you can enter email addresses of individuals with whom you want to share the selected documents. You may also set an expiration date for the share as well as a password to access the documents. When you are finished configuring the options in the dialog, click the Save button and the selected documents will be shared with the entered email addresses. |
|
Present Item |
Sends the selected item to PRESENT. This option is only available if PRESENT is installed and can only be selected if PRESENT is running. |
|
Add New Fact |
If Case Story is installed, you can click this option to add the selected item as a Fact in the Case Story Fact Grid. |
|
Add to Who's Who |
If Case Story is installed, and you have defined persons or entities in the Who's Who area in Case Story, you can right-click on any document and associate the document with the person or entity by clicking the Add to Who's Who option.. |
|
Insert Page |
Initiates the process to insert a page into the selected document. |
|
Insert Document Break |
Inserts a document break above the page selected within a document, creating a new document with succeeding pages falling under that new document. |
|
Remove Document Break |
Removes the document break of the selected document. |
|
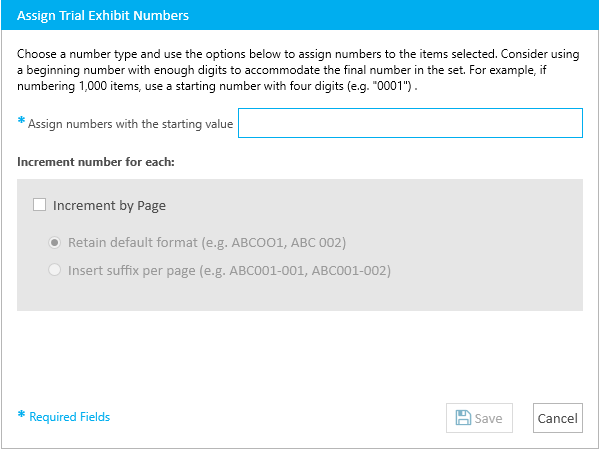
Assign Trial Exhibit Numbers to Selected Items |
Initiates the process to assign a trial exhibit number to each selected document. |
|
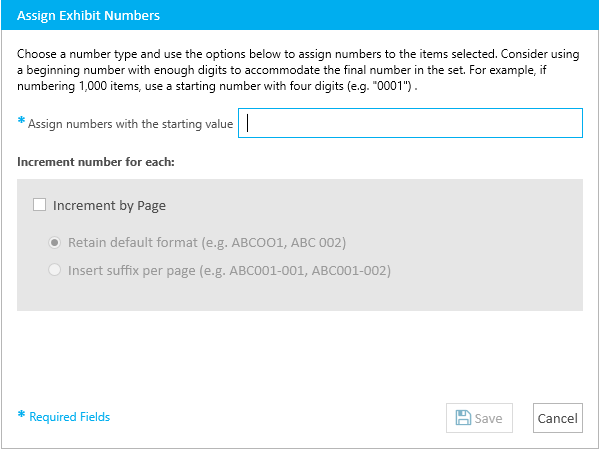
Assign Exhibit Numbers to Selected Items |
Initiates the process to assign an exhibit number to each selected document. |
|
Batch Field Fill Selected Items |
Initiates the process to fill the fields with a batch load process. |
|
Properties |
Opens the Properties dialog for the selected document. |